Workflow Management: The Secret to Profitable, On-Time Projects
Most “workflow management” in the design world is a dumpster fire. It’s a chaotic mess of endless email chains, vague feedback, missed deadlines, and a final product that looks nothing like what you originally wanted.
As a designer and business consultant who has navigated over 500 branding and web projects, I’ve seen it all. The real difference between a £2,000 project that ends in disaster and a £20,000 project that triples a client’s revenue isn’t the talent—it’s the workflow.
Your workflow is the invisible scaffolding that stops a creative project from collapsing in on itself. And most businesses, and frankly, many designers, are building with rotten wood.
The core problem is that most people treat design like a mystical art. It’s not. It’s a commercial service. It’s a process of solving business problems through visual communication. And like any process, it needs a system.
A solid workflow is the bedrock of good client communication. It replaces guesswork with a clear sequence of events. It sets expectations, defines responsibilities, and creates a single source of truth. Without it, you’re just gambling with your time and money.
- Define a clear, repeatable 5‑phase workflow (onboarding, creation, revisions, handoff, archive) to protect time and ensure profitable, on‑time projects.
- Collect a complete, signed brief and assets upfront; set expectations and revision limits to avoid scope creep and wasted work.
- Use a single source of truth and visual feedback tools (not email) to consolidate actionable feedback and speed delivery.
What ‘Workflow Management’ Actually Means for Designers (And Their Clients)
Let’s strip away the jargon.
Workflow management for design is simply a defined, repeatable system for moving a creative project from initial idea to final delivery.
That’s it. It’s the assembly line for your creativity.
- It defines who does what and when.
- It dictates HOW information is shared (the brief, the feedback, the files).
- It sets boundaries (such as revision limits and communication channels).
For entrepreneurs and small business owners, understanding this is critical. Whether you’re hiring a freelance designer, managing an in-house creative, or trying to DIY your brand, the workflow is your single greatest predictor of success or failure.
A good workflow prevents chaos. A great workflow creates value by protecting the time and energy needed for deep, creative work.
The 5 Phases of a Bulletproof Design Workflow
I’ve refined this process over a decade. Every successful project, from a simple logo to a 100-page website, follows these five distinct phases. If you skip one, you will pay for it later.
Phase 1: The ‘No Surprises’ Onboarding & Briefing
This phase is all about inputs. You cannot get a good output (design) from a bad input (brief). The goal here is to extract every piece of relevant information from the client’s head and document it.
- Kick-off Meeting: This isn’t just a “hello.” It’s a structured interview. What is the business goal? Who is the target audience? Who are the competitors? What is the one thing this design must achieve?
- The Creative Brief: All answers are documented in a single document. This “Project Brief” becomes the constitution for the project. It’s the focus by which all design decisions are measured.
- Asset Collection: Get everything upfront. Old logos, brand guidelines (if available), copy, and high-resolution images. Don’t let your designer chase you for files for three weeks.
- Set Expectations: This is where you lock in the rules. You confirm the timeline, the deliverables, and (most importantly) the number of revision rounds.
Pro-Tip: Your brief should focus on the problem, not the solution. Don’t say “I want a blue logo.” Say, “Our brand needs to convey trust and authority to a corporate audience.” Let the designer solve the problem.
Phase 2: The ‘Head Down’ Concept & Creation
Once the brief is signed off, the designer needs to be left alone to work. This is the “deep work” phase. Constant interruptions, “just checking in” emails, or new ideas will derail the entire process.
- Research & Moodboarding: The designer explores the competitive landscape and gathers visual inspiration (colours, fonts, imagery). This is shared with the client as a “style direction” to ensure everyone is on the same page before the actual design work begins.
- Initial Concepts (Drafting): The designer develops the first versions of the design (e.g., 2-3 unique logo concepts). This involves exploring various directions based on the brief.
- Internal Review: A good designer or agency doesn’t send you their first thought. They’ll have an internal review process to weed out the weak ideas and refine the strong ones.
Phase 3: The ‘Structured’ Feedback & Revision Loop

This is where most projects implode. Without a system, this phase becomes an endless, frustrating “tweak loop.”
The goal is to get clear, consolidated, and actionable feedback.
- Presentation: The designer shouldn’t just email a JPEG. They should present their work either in person, via a video call, or through a recorded video. They must explain why they made certain decisions and how those decisions link back to the project brief.
- Consolidated Feedback: The client does not send feedback in a 10-chain email. They gather all feedback from all stakeholders (e.g., the CEO, the marketing manager) into a single, consolidated document or (even better) using a visual feedback tool (like Frame.io or Figma comments).
- Actionable vs. Vague: This is the moment to ban vague feedback.
- Bad Feedback: “I don’t like the font.”
- Good Feedback: “The script font feels a bit too informal for our corporate audience. Can we explore a modern serif font, like the one we approved in the moodboard?”
- The Rounds: You have a defined number of rounds (I recommend two).
- Round 1: For big, structural changes (e.g., “Let’s move forward with Concept B, but can we try the colour palette from Concept A?”).
- Round 2: For minor tweaks (e.g., “Let’s nudge that logo 5px to the left,” “Fix the typo on page 2”).
- Any changes after Round 2 are considered “out of scope” and are billed separately. This single rule will save you thousands of pounds and weeks of time.
Phase 4: The ‘Clean’ Finalisation & Handoff
The design is approved! The project is not done. The handoff is the final, critical step. A bad handoff makes the entire project useless.
- File Preparation: The designer prepares all versions of the files you will ever need. This isn’t just one .jpg. It’s a comprehensive package.
- The Handoff Package: This should be delivered in a single, neatly organised cloud folder (e.g., Google Drive or Dropbox). It should include:
- Print Files: High-resolution CMYK files (e.g., .eps, .pdf) for printing.
- Web Files: Optimised RGB files (e.g., .svg, .png, .jpg) for websites, social media, etc.
- Source Files: The original, editable working files (e.g., .ai, .psd, .fig).
- A “Readme” Guide: A simple text file or PDF explaining what each file format is and when to use it. (e.g., “Use the RGB.png file for your website. Use the CMYK.eps file for your print broker.”)
Phase 5: The ‘Long Game’ Post-Project & Asset Management
The project is complete, and the final files have been delivered. Now what? A smart workflow includes a plan for the future.
- Project Archive: Both the designer and the client maintain a secure, backed-up copy of the final project folder.
- Digital Asset Management (DAM): For growing businesses, this is crucial. Where do these new assets live? They should be added to a central, company-wide library. This could be a simple, well-organised Google Drive folder or a dedicated DAM platform.
- The Follow-up: A good agency checks in. How are the new assets working? Is the team able to use the files? This builds long-term relationships and uncovers new opportunities.
Here is a simple table to summarise the entire process.
The 5-Phase Bulletproof Design Workflow
| Phase | Primary Goal | Key Actions | The “One Thing” to Avoid |
| 1. Onboarding & Briefing | Define 100% of the project scope and goals. | Kick-off call, complete project brief, collect all assets, set expectations. | Starting without a signed-off brief. |
| 2. Concept & Creation | Explore creative solutions to the brief’s problem. | Moodboarding, research, drafting 2-3 initial concepts, and internal review. | “Checking in” on the designer every day. |
| 3. Feedback & Revisions | Get clear, consolidated, and actionable feedback. | Present work, consolidate all feedback, and stick to the defined revision rounds. | Vague feedback (“make it pop”) and email chains. |
| 4. Finalisation & Handoff | Deliver a complete, organised, and usable file package. | Prepare all file formats (print/web/source), create a “Readme” guide. | Sending a single .jpg and calling it “done.” |
| 5. Post-Project & Archive | Ensure the long-term value and usability of the assets. | Archive final files (client & designer), add to a central asset library, follow up. | Losing the source files six months later. |
My “No Feedback Via Email” Rule: A Real-World Test
I want to share a quick story. About five years ago, my team was drowning. We were profitable, but everyone was stressed. Projects were constantly running over, and morale was low.
After an audit, I pinpointed the bottleneck: Email.
A single design revision was shared in an average of 12 different emails among 4 people. Critical instructions were missed, the wrong versions were being worked on, and everyone was frustrated.
So, I implemented one simple, brutal rule: “No Feedback Via Email. Period.”
All project communication had to occur within our project management tool (we used Basecamp at the time; now we use a combination of tools). All visual feedback had to be done using visual annotation tools (such as Frame.io).
The first two weeks were painful. Clients were annoyed. My team kept forgetting. But we held the line.
The results?
- Our average project delivery time was cut by 40% within three months.
- Client disputes over “what was agreed” dropped to zero.
- Designer stress plummeted because they had a single, clear to-do list, not an inbox of terror.
This is a workflow. It’s not a fancy piece of software. It’s a rule. It’s a system. The software was merely the means of enforcing the system.
🛑 Stop Blaming the Tools: A Fool with a Tool is Still a Fool
This brings me back to my pet peeve. Entrepreneurs love buying “solutions.” They think a subscription to Monday.com will fix their chaos.
It won’t.
Your workflow is the strategy. The tool is the tactic. You must first define your 5-phase workflow—on paper, in a Google Doc, on a napkin; I don’t care. Then, and only then, do you find a tool that fits your system.
Don’t adapt your process to the tool; instead, adapt the tool to your process. Select a tool that aligns with your workflow.
Workflow Tools: The Right Tool for the Right Job
| Tool Category | What It’s For | Popular Examples | My Honest Take |
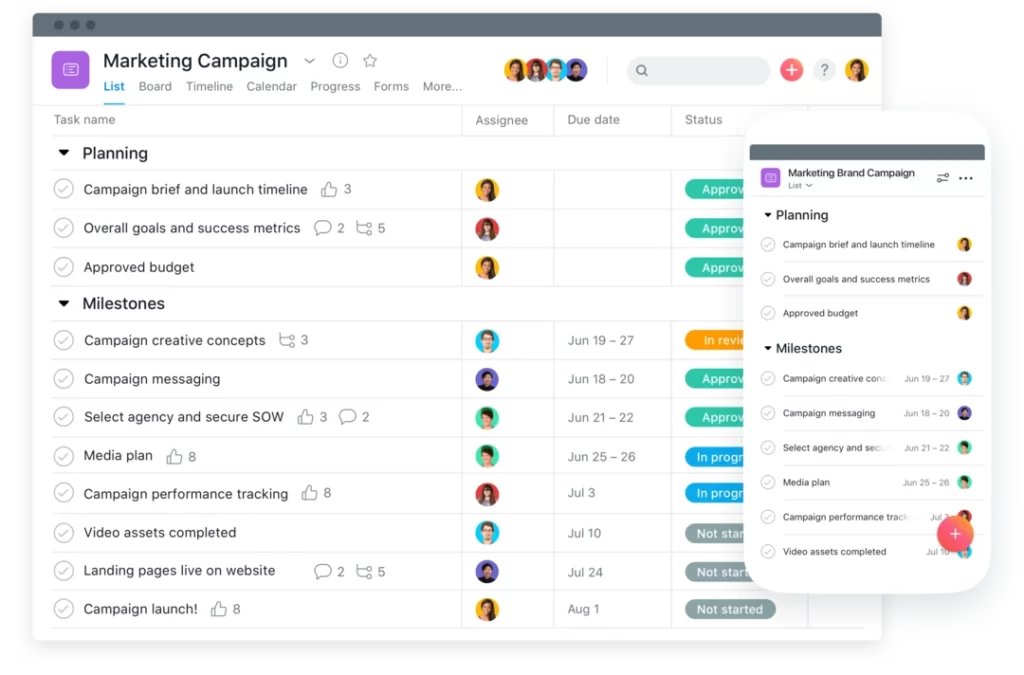
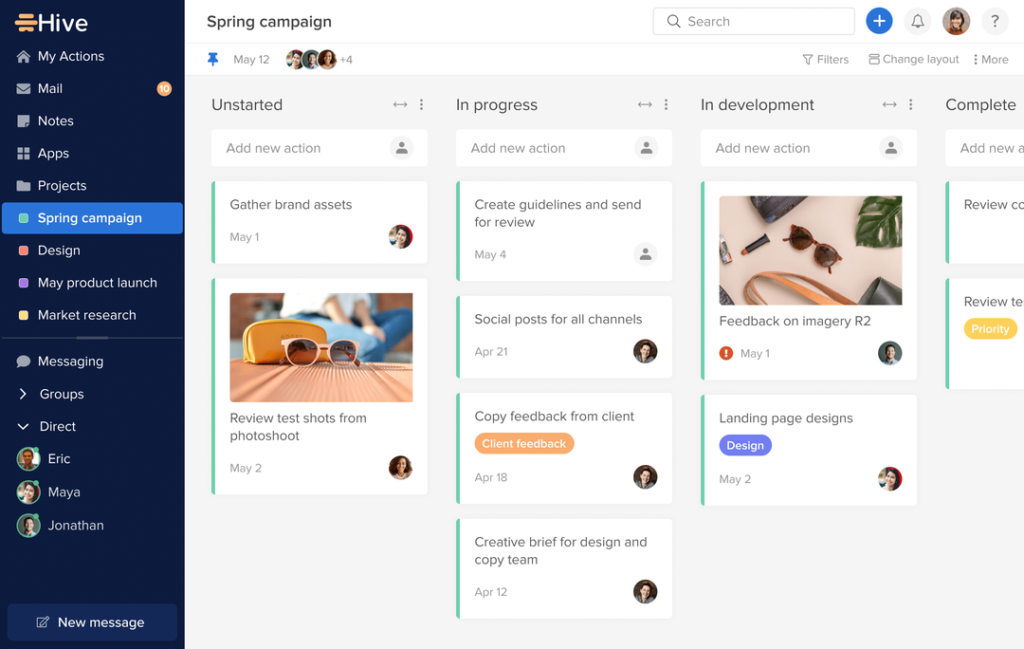
| Project Management (PM) | The “Single Source of Truth.” Manages tasks, timelines, and central communication. | Asana, ClickUp, Monday.com, Trello, Basecamp | Essential. This is your project’s “home base.” Trello is great for simple visual processes. Asana/ClickUp are better for complex projects with dependencies. |
| Visual Collaboration | Giving feedback directly on the creative work. | Figma, InVision, Frame.io, Filestage, Dropbox | A non-negotiable for design. Replaces “The logo in the top left” with a pin dropped exactly on the logo with a comment. Figma is the king for web/UI design. |
| File Storage & Handoff | Storing, sharing, and archiving the final, heavy files. | Google Drive, Dropbox, WeTransfer | You need a reliable, cloud-based home for your assets. Google Drive/Dropbox are best for permanent storage. WeTransfer is only for temporary delivery. |
| Briefing & Onboarding | Collecting client information in a structured way. | Google Forms, Typeform, or dedicated CRM tools (e.g., Dubsado) | Stop using Word docs for briefs. A simple, required-field form ensures you get all the necessary information before you start. |
How to Build Your Own Simple Design Workflow (Even if You’re a Team of One)
You don’t need a 50-person agency to have a good workflow. If you’re an entrepreneur managing a freelancer, or even doing design yourself, you can implement this today.
- Document Your 5 Phases: Literally, open a Google Doc. Write down the 5 phases: Onboarding, Creation, Revision, Handoff, Archive.
- Define Your “Single Source of Truth”: Where will this project live? Is it a Trello board? An Asana project? A specific Google Drive folder? Pick one place. All files, briefs, and comms go there.
- Create a “Project Brief” Template: Stop starting from scratch. Create a simple Google Form or document with all the questions you need to answer before a project begins. (Who is the audience? What is the goal? What are the deliverables?)
- Set the Rules of Engagement: Write them down. “We will have two rounds of revisions.” “All feedback will be delivered in a single document.” “All files will be delivered via a Google Drive link.”
- Build a “Handoff” Folder Template: Create an empty folder structure that you can duplicate for every new project.
- PROJECT_NAME/
- 01_Brief_and_Comms/
- 02_Working_Files/
- 03_For_Client_Review/
- 04_FINAL_HANDOFF/
- Print/
- Web/
- Source/
- PROJECT_NAME/
That’s it. You just built a professional workflow. It costs you £0 and will save you hundreds of hours.
What to Look For in a Design Agency’s Workflow (Before You Hire Them)
Now, let’s say you’re ready to hire a professional. How do you spot an agency with a great workflow (like ours) versus a chaotic amateur?
You have to ask the right questions. Don’t just look at their portfolio. Ask them to describe their process.
If they can’t answer the following questions clearly and confidently, run away.
- “Can you walk me through your process, from the day we sign the contract to the day you deliver the final files?”
- Bad Answer: “You send us your ideas, we design them, and we send them back!”
- Good Answer: “Absolutely. We start with a 60-minute kick-off call to complete our project brief. From there, our team researches and creates moodboards…” (They should basically describe the 5 phases).
- “How do you handle project management and communication?”
- Bad Answer: “We just use email, it’s easiest.”
- Good Answer: “You’ll be given access to our project management portal (like Asana or Basecamp). All communications, files, and timelines live there, so you have 24/7 visibility.”
- “How do revision rounds work? How many are included?”
- Bad Answer: “We just tweak it ’til you love it!” (This is a huge red flag for a project that will never end).
- Good Answer: “We include two full rounds of revisions, which we find is perfect for 99% of projects. Round 1 is for structural changes, and Round 2 is for fine-tuning. Any further rounds are billed at our hourly rate to keep the project on track.”
- “What exactly do I receive in the final handoff?”
- Bad Answer: “We’ll send you the logo.”
- Good Answer: “You’ll receive a full handoff package in a shared drive, including high-res print files (EPS, PDF), web-optimised files (SVG, PNG), and the original vector source files. We also provide a simple brand guide explaining how to use them.”
When you hire a professional design agency, you are not just paying for their creative talent. You are paying for their process. Their workflow is the machine that turns your business goals into a tangible, valuable asset.
A great workflow is, itself, the most valuable service a design agency offers. It’s the guarantee that you won’t be tearing your hair out in three weeks, buried in emails and wondering where your money went.
Your Workflow is Your Business’s Engine
Ultimately, workflow management is more than just a boring administrative task. It’s the engine of your creative business.
For the designer, it’s the only path to profitable, scalable, and enjoyable work. It protects your creativity from the chaos of client management.
For the entrepreneur, it’s your quality control. It’s the system that ensures what you briefed is what gets delivered. It’s the difference between a design project being a costly, frustrating expense and a strategic, high-ROI investment.
Stop accepting chaos as “part of the creative process.” It’s not. It’s a sign of a broken process.
Define your phases. Set your rules. Choose your tools (in that order). And watch your entire design process transform from a liability into your greatest asset.
Need a Workflow That Just Works?
If you’re tired of managing the chaos and just want a proven, professional process that delivers world-class branding and design, you’re in the right place.
The 5-phase system you just read? That’s how we run Inkbot Design.
We’ve built our entire business around a workflow that is transparent, efficient, and built to produce stunning results without the headaches. If you’re ready to work with branding experts who value your time and your goals, take a look at our graphic design services.
When you’re ready to start a project the right way, request a quote, and we can show you our process in action.
FAQs about Design Workflow Management
What is the most important part of a design workflow?
The Briefing & Onboarding phase. If you get this wrong, the entire project is built on a weak foundation. A clear, detailed brief that is agreed upon by all stakeholders is the single best way to prevent failure.
How many revision rounds should be included in a design project?
Two is the professional standard. Round 1 for major conceptual changes (e.g., “Let’s use this other concept”). Round 2 for minor, specific tweaks (e.g., “Change this word, move this icon”). Any more should be billed hourly to prevent “scope creep.”
What’s the best software for design workflow management?
This is a trick question. The best “workflow” is a system first. Start with a simple toolset. I recommend:
PM: Trello (simple) or Asana (complex)
Visual Feedback: Figma (for web/UI) or Filestage (for general creative)
Storage: Google Drive or Dropbox
How can I provide effective design feedback?
Be specific, consolidated, and objective.
Don’t say: “I don’t like it.”
Do say: “The goal in the brief was ‘trustworthy.’ This bright orange colour feels more ‘playful’ than ‘trustworthy.’ Can we explore the blue palette we discussed?”
Additionally, compile all feedback from your team into a single document.
What files should I get from a designer at the end of a logo project?
A complete handoff package should include:
Vector Source File: .ai or .eps (The master, editable file)
Web Files (RGB): .svg (for websites), .png (with a transparent background)
Print Files (CMYK): .eps or high-res .pdf (for professional printing)
You should also receive versions in full colour, all-white, and all-black.
What’s the difference between workflow management and project management?
Project management is about a single project’s timeline, tasks, and budget. Workflow management is a repeatable system or process applied to all projects of a similar type. Your workflow is the blueprint; project management is the act of building the house.
Why do designers hate “make it pop”?
Because it’s not actionable feedback. It’s a subjective opinion that doesn’t tell the designer what to do. Does “pop” mean “make it brighter,” “make it bigger,” “add a drop shadow,” or “use a different font”? It forces the designer to guess, which wastes time.
How can I manage a design workflow as a solo business owner?
Use templates. Create a simple “Project Brief” template (using a Google Form), a “Handoff” folder template (in Google Drive), and a “Process” checklist (in Trello). Standardising your own process, even if you’re a team of one, will save you dozens of hours.
Is it rude to set a limit on revisions?
No, it’s professional. It sets clear boundaries and respects the designer’s time (and your budget). An unlimited “tweak it ’til you love it” policy is a sign of an amateur who doesn’t value their own work and will lead to a never-ending project.
What is a “Digital Asset Management” (DAM) system?
For a small business, it’s just a central, organised library for all your final brand assets (logos, photos, fonts, etc.). Instead of asking “Hey, where’s our logo?” 100 times, everyone knows to go to the “Brand Assets” folder in the company’s Google Drive.
What is a “moodboard” and why is it necessary?
A moodboard is a collage of visual inspiration (colours, textures, fonts, photos) presented before the main design work starts. Its purpose is to get buy-in on a visual direction so the designer doesn’t spend 20 hours designing something in a style you hate.
